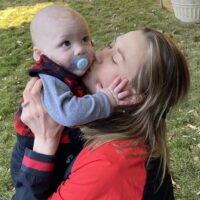
Is there anything cuter than an itty bitty baby with a gigantic bow on her head? This adorable accessory is the perfect addition to any outfit, but for the mom who wants to ensure that her daughter has this stylish headpiece for every ensemble, it can become quite expensive. Thankfully, it is actually quite simple to make your own baby bows!
Headband Style Bows
For newborns and babies who are not quite as blessed in the hair department just yet, a headband-style bow is a perfect way to accessorize! Best of all, it is a quick and easy item to make yourself!
Supplies Needed
- Soft Measuring Tape
- Fabric
- Ruler
- Rotary Cutter
- Sewing Machine
- Thread
- Hot Glue Gun
Step #1: Pick Your Fabric
Depending on the age of your child, this small detail can have a big impact on their skin. As we all know, newborns have very sensitive skin, so it is best to use gentle fabrics and to avoid embellishments that could pose a choking hazard.
Moreover, your baby’s skull is soft at birth. This is what allows them to exit the birth canal without the risk of injury. While the smaller spaces will close within a matter of months, the larger front spot can take around eighteen months to fully close. This detail is important because you want to create an accessory that is not going to put pressure on the various soft spots on their head.
Why does all of this matter? When purchasing fabric, you need to look for varieties that are soft and stretchy! This can keep your baby comfortable and allow their head to continue to form normally.
Therefore, fabrics for a baby bow attached to a headband include jacquard fabric or jersey knit. While spandex or nylon may seem like good options, these can be a trigger for babies who have eczema-prone skin.
However, once they get older you can start to get more creative with your material choice. Moreover, if you make clip-on baby bows, then any fabric will do!
RELATED: How To Keep Baby’s Hair Out of Eyes
Step #2: Take Your Measurements
How big is your beautiful baby’s head? Take a soft measuring tape and calculate the circumference of their adorable noggin and then add half an inch to that number. This will be the length of the fabric for the headband portion of the bow.
Step #3: Cut The Fabric
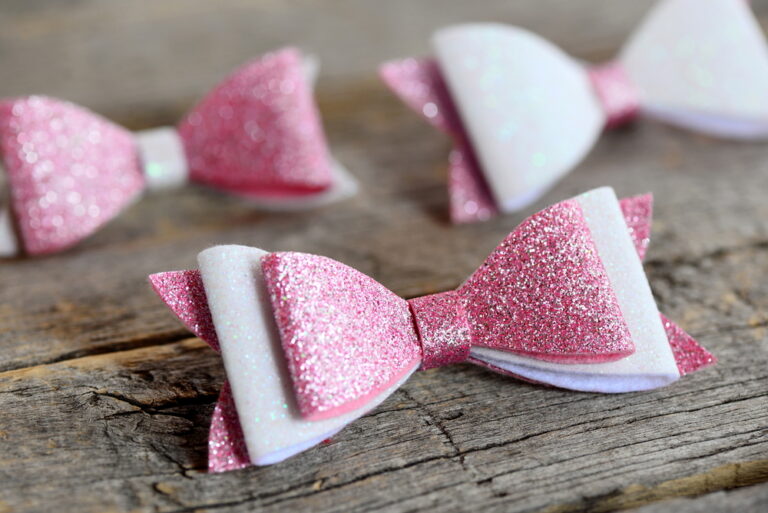
The width of all of your fabric pieces needs to be six inches long. As mentioned, the headband portion needs to be at a length of the circumference of their head plus half an inch [Part A]. Then, you will cut out two nine-inch pieces for the bow [Parts B & C] and a 2-inch piece for the center [Part D]. This process is best done with a rotary cutter and a straight edge, like your ruler, to ensure that the edges of your bow remain uniform.
Step #4: Sew The Individual Pieces
Fold parts A, B, and C in half, making the width three inches instead of six. The backside of the fabric should be facing outward for this step. Then, sew along the length of each piece of fabric. Once the stitching is done, flip the pieces so that the pretty side of the fabric is now facing outward!
Once everything is flipped the right way, then center the seams of parts A, B and C. Fold each piece inward so that the seam is facing out and remains in the center of the fabric. This should cut your lengths in half. Next, you will sew along the width portion of the pieces to create all of the parts of your bow. Lastly, just like before, flip everything so that the pretty sides face outward!
Step #5: Assemble Your Baby Bow
Align The Pieces
On a flat surface, take the headband portion [Part A], center the seam, and lay it down with the seam facing upward. Next, center the seams on parts B and C. Make sure to place them next to one another facing downward over the center of the headband piece. In this step, the long sides of all of the parts should align. You should essentially see a small plus sign shape at this point in the process.
Once this is complete, carefully pick up the pieces as a single unit, allowing the bottom part of the headband to fall. While holding the top of the headband and the two bow pieces, slowly fold the center parts B and C like an accordion widthwise. This should turn them into the stereotypical bow shape that is small in the center and wide at the edges.
Finally, take part D and drape it over the center of parts B and C where the fabric has been folded. Then, carefully flip the entire layering of fabric upside down (with the bow facing downward at this point). Center part D and then pull one side of part D into the inside portion of the headband (the part that will rest on your baby’s forehead).
Adhere Them Together
Take a hot glue gun and place a small amount of glue on the center of the back of the bow (this will be directly on one side of part D). Then tightly pull the other side of Part D over the glue to pull the bow together! Pinch the center of the bow tightly until the glue has dried and then cut away the excess fabric from part D.
Shape the bow to your liking and then, Voila! Your baby has a stylish accessory that is comfy and cute! Overall, this process should take five minutes and if you buy the fabric from a local craft store, this project is simple and affordable!
RELATED: How To Make Baby Burp Cloths
Clip-On Style Bows
This option is much simpler to make, but also requires your child to have a decent amount of hair on their head! Also, no machinery is necessary with this process!
Supplies Needed
- Fabric
- Ruler
- Rotary Cutter
- 3” Alligator Clip
- Hot Glue Gun
RELATED: The Best Hair Ties for Babies
Step #1: Prepare The Material
Whatever fabric you choose, cut out a section that is eighteen inches in length and five inches in width using a rotary cutter and the straight edge of your ruler. Next, lay the fabric down with the backside facing up. Fold one side of the fabric over five inches, making the length thirteen inches. Repeat this step again, making the length 8 inches.
Step #2: Tie The Center Knot
Next, pinch the middle of the folded portion of the fabric like an accordion. This will make the bows overall shape. Then, while holding the center of your bow with your pointer finger and your thumb, wrap the remainder of the unfolded fabric around the center, tying a knot after looping it around! Make sure that you wrap this section with the pretty side of the fabric facing outward.
Step #3: Attach The Alligator Clip
Shape the bow to your liking and then tuck the remainder of the center fabric under your knot. Finally, grab a three-inch alligator clip and your hot glue! Adhere the bow to the center of the clip and pinch the combination until the glue dries completely.
Again, this process should take less than five minutes and it is budget-friendly! Furthermore, for the older kids, instead of making a clip-on style bow, you can also slip a hair tie into the centerfold of the bow before tying it off. This can help the bow to stay on their head more readily if they intend to wear it during a sporting event or other more vigorous activity!
FAQs – How To Make Baby Bows
Are baby bows safe for babies?
As long as they are under your supervision, these accessories are perfectly safe. However, it is always recommended to remove any style bow from your baby’s head before you put them down for a nap, just like you would with bandanas, bibs, or stuffed animals.
Depending on the size of your clip-on bow, this can become a choking hazard if they pull it off and put it in their mouth. Moreover, a headband-style bow can become a suffocation threat if it were to slide over their mouth or around their neck. Therefore, no matter if your child is three months or three years old, keep accessories out of the crib while they slumber!
Are there ways to spruce up the bow?
Absolutely! The world is your oyster! While shopping at your local fabric or hobby store, purchase buttons, plastic bow accessories, or consider buying multiple types of fabric to truly make the bows your own creation! However, it is important to remember that for little ones, some of these parts can be a choking risk.
This means that it is imperative to ensure that they have adhered securely to the fabric. We recommend doubling up on that process by utilizing both a glue gun and thread if the accessory allows it! Also, as mentioned above, as long as the bow stays on their head, this risk will lessen tremendously.
Do I have to use a sewing machine for a headband-style bow?
No! This process can easily be done by hand. However, it will take longer to complete since you will have to sew seven different sections throughout the aforementioned steps. If you choose to go this route, keep the stitches close together to ensure that the fabric holds together effectively.
Moreover, you want to keep the stitching close to the edges of the material and double-check that the stitching on the two sides of the bow [Parts B and C] line up properly. If this is not the case, there is a chance that the end result will look uneven.
Final Thoughts
One of the most frustrating parts of being a girl mom is hearing those dreaded words “How old is HE?”. While this can make your blood boil, if your daughter is not in stereotypical girl’s attire, it can be hard to decipher the sex of a brand new, bald baby. Thus, a headband-style bow is a perfect way to show off your beautiful baby girl!
Moreover, bows are just a fun way to spruce up an outfit! Save your money and invest a small amount of time to create a myriad of accessories for your sweet little one! This can also be a simple, yet lucrative business venture for a stay-at-home mom! When you look at the time and capital it takes to create a bow-making business, it is an easy method for making extra money on the side, and it does not require a lot of undivided attention!