 Beforel I had children, I had never changed a diaper in my life. Even during the brief time that I worked as a babysitter, I never changed a diaper.
Truthfully, the idea of changing diapers gave me anxiety. Because of how it is depicted on TV shows and in movies, I was convinced that each diaper change would be a potential dousing of excrement.
Luckily, this proved to be untrue! While taking care of my two boys, I’ve changed many diapers, and lived to tell the tale.
Although these tips are based on experiences with my boys, they can work just as well for girls. Here’s my guide on how to change diapers, and remain unsoiled.
Be smart
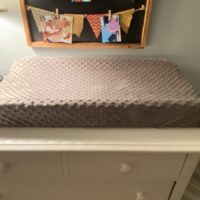
It’s true. Every time you change a diaper, there is a chance that some of its contents will end up on you, so be smart. Designating a specific location for diaper changes, such as a changing table, can be very helpful (source). In my case, I covered this table with a changing pad, then placed my baby on it length-wise. This directional decision was important because it meant the difference between needing to clean the floor versus myself.
Be prepared
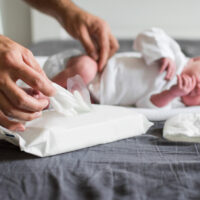
You will need to dispose of the soiled diaper, so have a clean one ready. Take the time to completely unfold the clean diaper before removing the dirty one. This diaper can also be used as a shield.
After unfastening and opening the dirty diaper, place the open clean diaper over the genital area. This will block any urine or stool sprays that may occur during the diaper change. My philosophy is that it is better to use two diapers than to get sprayed in the face with urine. But, if you are more frugal, you can also invest in some PeePee TeePees.
Get to know your child’s potty trends
My experiences with each of my boys were very different. The first one would start to spray a stream of urine as soon as he was exposed to air, but my second boy did not. Also, my oldest needed more time for pooping, but my second one was more of a “one and done” kind of guy.
Because of these differences, I developed two diaper changing protocols.
The disposable diaper changing protocol for child #1
- Wash your hands.
- Check the diaper to determine if it is just wet or has stool. If it is the latter, I normally gave my baby another five minutes or so to ensure that he had finished his “business.” Bending his knees toward his chest sometimes helped to reduce the odds of a mess.
- Once you decide that it’s time to change the diaper, get the new diaper ready.
- Open the soiled diaper to expose him to air for a few seconds. Then, tuck his penis back down, and replace the front of the soiled diaper while he goes again. (For this son, I didn’t bother putting the clean diaper up as a shield because he peed again every time I changed him.)
- Bend the knees toward his chest while he’s still loosely covered.
- If the diaper only has urine, place the clean diaper underneath his bottom, then remove the wet one. If there is stool in the diaper, use the front flap of the dirty diaper to wipe the area (source).
- Use wipes to clean the area, wiping from front to back. For boys, be sure to wipe around the penis and under the scrotum. Place dirty wipes on the dirty diaper.
- Once the area is clean, apply any necessary diaper creams or ointments. Close and secure the new diaper.
- Fold the soiled diaper into a ball, using the tabs to securely contain all of the dirty contents. I can guarantee you that, if you don’t seal the diaper, your baby will end up with his or her foot in the mess.
- Dispose of the diaper into a lined container or designated diaper pail. This prevents a curious crawling baby from accessing his or her soiled diapers (source).
- Redress your baby, then wash your hands.
The diaper changing protocol for child #2
For the second boy, diaper changes were quite a bit different. He rarely peed upon opening his diaper and exposing him to air. He also passed stools rather quickly. Because of this, his diaper changing protocol looked more like this:
- Check the diaper to determine if it has urine or stool.
- Prepare the new diaper.
- If there is only urine, place the clean diaper under his bottom, then remove the wet one. If he has has stooled, use the front flap of the dirty diaper to wipe the area.
- Finish cleaning the area with baby wipes, then place them on the dirty diaper.
- Once the area is clean, allow it to dry a bit, then apply any rash prevention products. Close and secure the clean diaper.
- Fold the soiled diaper into a ball, and use the tabs to seal it.
- Dispose of this diaper in a lined trash can or designated diaper pail.
- Dress your baby again, then wash your hands.
What about cloth diapers?
Cloth diapers have become increasingly popular as an alternative to disposable ones. While they are better for the environment, cloth diapers will require a different diaper changing technique (source).
- Cloth diapers are typically made of cotton, and require the use of a leakproof cover. For diaper changes, you will want to have your baby either lie on the opened leakproof cover, or on a waterproof changing pad.
- Prepare the clean cloth diaper by folding it into either a triangle or rectangular shape. Also, have the safety pins ready.
- Remove the soiled diaper. Wipe and dry the area as discussed in the previous sections.
- Place the folded clean cloth diaper under your baby’s bottom.
- If using a diaper cream or ointment, check the diaper manufacturer’s instructions first. Some products can damage the cloth diaper material.
- Secure the cloth diaper with safety pins that have protective covers. This prevents an accidental injury.
- Apply a clean leakproof diaper cover, and re-dress your baby.
- If the soled diaper only contains urine, it may be placed in a diaper pail until ready to launder. Stool-filled cloth diapers should be emptied into the toilet, then rinsed (source).
- Wash your hands.
Don’t rush
There is no parent prize for “finishing first.” Take your time, and make good decisions while changing your baby’s diaper. Paying attention to the task can be what makes the difference between a mess on the floor and a mandatory shower for you.